Archive for the ‘Everything’ category

Attempting to install MOST4Linux 1.0.0 under Ubuntu – Part 1

May 24, 2012

Earlier on today, I decided to see if I could build the Media-Oriented Systems Transport protocol stack from the MOST4Linux project under Ubuntu 11.04.

However, it was originally designed for earlier versions of the Linux kernel than 2.6.38; and is no longer actively maintained by its developers – which makes compiling, and using it a challenge.

When I initially attempted to build the code, after downloading and extracting the most recent source code archive, the build process failed with:


Config files successfully generated by ./configure
Install prefix /usr/local/most4linux
Install path for driver modules /usr/local/most4linux/modules
Linux kernel source tree /lib/modules/2.6.38-8-generic/build
Build driver with real-time support disabled
Compile MOST NetServices library disabled
Compile with ALSA example enabled
Print debug messages disabled
Print trace messages disabled
Print debug messages on all register accesses disabled
Print debug messages for ioctl syscall disabled
Print debug messages for OS-8104 register access disabled
Print debug messages in non real-time ISRs disabled
Print debug messages in real-time ISRs disabled
Print debug messages for receive buffer disabled
Print debug messages for transmit buffer disabled
Print debug messages in sync module disabled
Print debug messages in NetServices module disabled
Print debug messages in alsa driver disabled
Debugging over serial port in realtime disabled
Now type 'make' to compile and afterwards 'make install' to install the driver
root@ubuntu:~/most4linux-1.0.0# make
Making all in most-kernel
make[1]: Entering directory `/home/tysonkey/most4linux-1.0.0/most-kernel'
make -f ./Makefile.kbuild KERNELDIR=/lib/modules/2.6.38-8-generic/build \
KMOD_CFLAGS=" \
-DHAVE_CONFIG_H \
-I/home/tysonkey/most4linux-1.0.0" \
RT=disabled
make[2]: Entering directory `/home/tysonkey/most4linux-1.0.0/most-kernel'
make -C /lib/modules/2.6.38-8-generic/build M=/home/tysonkey/most4linux-1.0.0/most-kernel
make[3]: Entering directory `/usr/src/linux-headers-2.6.38-8-generic'
LD /home/tysonkey/most4linux-1.0.0/most-kernel/built-in.o
CC [M] /home/tysonkey/most4linux-1.0.0/most-kernel/most-alsa.o
/home/tysonkey/most4linux-1.0.0/most-kernel/most-alsa.c:27:26: fatal error: sound/driver.h: No such file or directory
compilation terminated.
make[4]: *** [/home/tysonkey/most4linux-1.0.0/most-kernel/most-alsa.o] Error 1
make[3]: *** [_module_/home/tysonkey/most4linux-1.0.0/most-kernel] Error 2
make[3]: Leaving directory `/usr/src/linux-headers-2.6.38-8-generic'
make[2]: *** [default] Error 2
make[2]: Leaving directory `/home/tysonkey/most4linux-1.0.0/most-kernel'
make[1]: *** [all-local] Error 2
make[1]: Leaving directory `/home/tysonkey/most4linux-1.0.0/most-kernel'
make: *** [all-recursive] Error 1
root@ubuntu:~/most4linux-1.0.0#

view raw

gistfile1.txt

hosted with ❤ by GitHub

By making a number of modifications to the source code and build scripts, I was eventually able to reach this stage:


root@ubuntu:~/most4linux-1.0.0/most-kernel# make
make -f ./Makefile.kbuild KERNELDIR=/lib/modules/2.6.38-8-generic/build \
KMOD_CFLAGS=" \
-DHAVE_CONFIG_H \
-I/home/tysonkey/most4linux-1.0.0" \
RT=disabled
make[1]: Entering directory `/home/tysonkey/most4linux-1.0.0/most-kernel'
make -C /lib/modules/2.6.38-8-generic/build M=/home/tysonkey/most4linux-1.0.0/most-kernel
make[2]: Entering directory `/usr/src/linux-headers-2.6.38-8-generic'
Building modules, stage 2.
MODPOST 4 modules
/home/tysonkey/most4linux-1.0.0/most-kernel/most-pci: struct pci_device_id is 32 bytes. The last of 2 is:
0x00 0x00 0x00 0x00 0x00 0x00 0x00 0x00 0xff 0xff 0xff 0xff 0xff 0xff 0xff 0xff 0x00 0x00 0x00 0x00 0x00 0x00 0x00 0x00 0x00 0x00 0x00 0x00 0x00 0x00 0x00 0x00
FATAL: /home/tysonkey/most4linux-1.0.0/most-kernel/most-pci: struct pci_device_id is not terminated with a NULL entry!
make[3]: *** [__modpost] Error 1
make[2]: *** [modules] Error 2
make[2]: Leaving directory `/usr/src/linux-headers-2.6.38-8-generic'
make[1]: *** [default] Error 2
make[1]: Leaving directory `/home/tysonkey/most4linux-1.0.0/most-kernel'
make: *** [all-local] Error 2

view raw

gistfile1.txt

hosted with ❤ by GitHub

Unfortunately, I’m unsure of the best way to continue – so I’ve decided to dump my modified code on BitBucket.

Those curious about my modifications to achieve the aforementioned result can deduce them from the “reversed” difference list – which was created by adding my modified version of the code into a special branch in a new Mercurial repository (“Initial_Ubuntu_Port_Attempt“), and then retroactively importing the original version of the code into yet another branch (“Original_Code“).

When I get the chance, I’ll probably document how I arrived at that conclusion, and share some resources that I discovered along the way.
日本語 Reading List

April 12, 2012

I thought that I’d share a list of interesting-looking books that I discovered in the university library recently, that may be pertinent to others interested in learning the Japanese language (or at least distantly studying it for other reasons), along with some observations about them that I’ve made.

Obviously, I haven’t read everything mentioned here, so I can’t vouch for the quality or usefulness of some items – and I don’t intend to create an exhaustive list of reading materials, or attributes thereof.

With that in mind, here they are:

Japanese for Busy People, Version 2

  • Published by Kodansha in 1994
  • Authored by the Association for Japanese-Language Teaching
  • University library Call Number: F 495.6 ASS
  • Purchasable from Amazon UK
  • Contains dialogues in Romaji and Kana/Kanji with English translations
  • Seems to be fairly easy, and enjoyable to read – but assumes knowledge of at least the Kana character sets from the beginning
  • ISBN: 4770018843

Kanji for Understanding Technical Japanese

  • Published by the University of Wisconsin Press, and the University of Tokyo Press in 1995
  • Authored by Edward E. Daub
  • Seems to have at least 2 ISBNs – 0299147045, and 4130870521 
  • University library Call Number: F 495.6 DAU 
  • Can be previewed on Google Books
  • Consists mostly of Kanji definitions with Kana readings and English translations, and annotated descriptive paragraphs in Japanese
  • ISBN: 0299147045
The Kanji Dictionary
  • Authored by Mark Spahn, and Wolfgang Hadamitzky
  • University library Call Number: F 039.56 SPA – for library reference use only
  • Purchasable from Amazon UK
  • Can be previewed on Google Books
  • ISBN: 0804820589

Essential Kanji

  • Authored by Patrick Geoffrey O’Neill
  • University library Call Number: F 495.61 ONE
  • ISBN: 0834802228
I also have a few others on my list, which I’ll probably share later – although those either had copies readily available at the time when I compiled it (last month), or seemed the most useful.

Interfacing with a PayPass card under Linux using LibNFC

March 14, 2012

This morning, I received an Orange Cash prepaid debit MasterCard, and preceded to see if I could use its ISO/IEC 14443-A interface to access its EMV application directory.

After spending some time searching the Web, I realised that not many people have successfully attempted to do so using LibNFC (or if they have, they’ve decided to remain quiet about it, for reasons unknown); and resorted to trying to use CardPeek‘s EMV script – which worked successfully with the ISO/IEC 7816 contact interfaces of all of the cards that I’ve tried (until I accidentally broke one of the contact interface pins), but doesn’t work with my reader’s RFID transceiver…

Using LibNFC’s nfc-list -v command, I was able to obtain the following information regarding the contactless interface:

1 ISO14443A passive target(s) found:
    ATQA (SENS_RES): 00  04
* UID size: single
* bit frame anticollision supported
       UID (NFCID1): 29  8b  cf  51
      SAK (SEL_RES): 28
* Compliant with ISO/IEC 14443-4
* Not compliant with ISO/IEC 18092
   ATS: 78 80 82 02 80 31 80 66 b0 84
 12 01 6e 01 83 00 90 00
* Max Frame Size accepted by PICC: 256 bytes
* Bit Rate Capability:
  * Same bitrate in both directions mandatory
* Frame Waiting Time: 77.33 ms
* Start-up Frame Guard Time: 1.208 ms
* Node ADdress not supported
* Card IDentifier supported
* Historical bytes Tk: 80 31 80 66 b0 84 12 01 6e 01 83 00 90 00
  * Tk after 0x80 consist of optional consecutive
      COMPACT-TLV data objects;
    the last data object may carry a status indicator of one,
      two or three bytes.
    See ISO/IEC 7816-4 8.1.1.3 for more info
Fingerprinting based on ATQA & SAK values:
* JCOP31 v2.3.1
* SmartMX with Mifare 1K emulation

I’ve modified the formatting of that command’s output slightly, so that it fits within this blog’s template boundaries –  but the data is identical to what I see when running it.

Since I couldn’t find any useful example code in C or C++ for exchanging ISO/IEC 7816 APDUs with contactless cards, I decided to investigate the possibility of modifying one of the TAMA scripts (UltraLightRead.cmd) in the LibNFC repository, and discovered that by prefixing the EMV commands mentioned in Saush’s blog post with 40 01, I was able to make the card respond to a request for the Payment System Environment.

The resulting script looks like this:

02; // Get firmware version
4A 01 00; // 1 target requested
// Select the payment system environment
40 01 00 A4 04 00 0E 31 50 41 59 2E 53 59 53 2E 44 44 46 30 31;

And the resulting packet received from the card reader’s PN532 chipset looks like:

If I get chance, I’ll probably see if I can modify CardPeek’s EMV script somehow to generate APDUs with InDataExchange (0x40) framing, and hopefully get contactless mode working with my reader (so that I don’t have to implement EMV by myself, in order to test other commands) – but I have my doubts, somehow.

In the meantime, I hope that this discovery is vaguely helpful for others…

New Wireshark USB CCID Dissector Functionality

March 4, 2012

As I mentioned in my previous post, I’ve been working on improving support for dissecting smartcards-related protocols in Wireshark, and delivered preliminary support for the USB CCID specification in November 2011.

Since then, I decided to implement support for switching the protocol used for dissection of payloads sent from the PC to the card reader using Wireshark’s preferences mechanism, after reading the source code for the I2C dissector.

This functionality was accepted upstream in SVN revisions 41151 and 41156, and consisted of two patches – one of which implemented it in a hackish manner, and the other served to clean things up in the hopes of making the code more readable and maintainable.

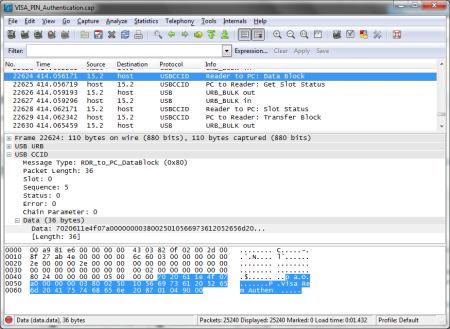
Prior to implementing this, I decided to conservatively treat data flowing to and from a card and reader in a generic manner, since users are likely to use a diverse range of standardised and proprietary protocols – the result of which looked like:

Now, right-clicking on the “USB CCID” row of the protocol tree reveals a “Protocol Preferences” submenu, which contains another one entitled “PC -> Reader Payload Type“:

The Protocol Preferences Submenu

As you can probably tell, I’ve retained the generic dissection support, in addition to providing the option of dissecting payloads using the dissector for the GSM SIM profile of the ISO/IEC 7816 contact smartcard standard, as developed by the Osmocom SIMTrace project.

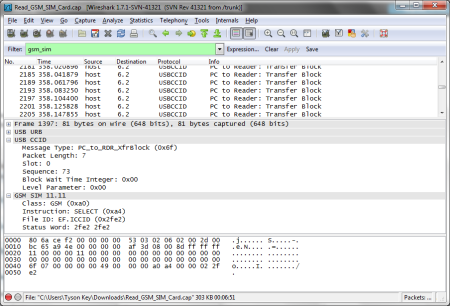
Upon activating the SIM dissector, PC_to_RDR_XfrBlock (0x6f) packet payloads should be dissected in a slightly more useful manner:

The GSM SIM dissector

Obviously, there are still some outstanding bugs that I’m aware of (the CCID dissector’s info column text overrides that of the selected dissector, and the GSM SIM dissector itself doesn’t cope with packets without status words well, at present), although I aim to resolve those in time – along with adding support for new payload protocols.

In the meantime, I hope that others will find this enhancement useful.

こんにちは惑星

February 5, 2012

Since it’s been a while since I last posted anything here, I thought that I’d briefly summarise what I’ve been doing over the past few months. If I get chance, I’ll probably follow up with more detailed posts, later.

I’ll also apologise in advance, if the quality of this post is below my usual standards – since I’m tired, and I’ll admit that it’s been quite a long time since I’ve produced any prose that’s more complex than one of my typical Tweets, e-mails, or IM/IRC sessions.

A Japanese Redux

As you can probably tell from this post’s title (Kon’nichi wa Wakusei/Hello, Planet), I’ve recently decided to resume learning Japanese using new techniques, after a multi-year hiatus – so that I can enjoy, and understand a multitude of content (music, blogs, and technical documentation, amongst other things); along with hopefully engaging in even more insightful and interesting conversations.

I’m already somewhat able to read and recognise text written in Katakana and Hiragana (providing that I’m undisturbed); and I seem to have a decent recall rate, according to the SayJack Hiragana listening quiz – although I’ll need to keep reading, listening and practising, in order to succeed in the long-term.

Obviously, I’m already capable of writing in Japanese using an Input Method Engine (I’m currently using Google’s – but I’ve also got a trial copy of ATOK in my “Downloads” folder), and can sort-of write a handful of characters on paper.  My listening skills are also constantly improving.

I also realise that my Japanese vocabulary leaves much to be desired for – although I’m acquiring words and phrases as I progress; and I guess that it’s something that I’ll continue to do, long after understanding the basics.

The Epiphany

At ~5:03 am GMT, I had an epiphany in comprehending the phrase 「僕は日本語を学んでいます」(Boku wa nihongo o manande imasu/”I have learned [the] Japanese“) , after reading comments on a Google+ greeting post that I addressed to the author of the hiro99ma blog, and looking up the meaning of  「を」 (wo – pronounced “o”).

Collectively concluding that 「は」(ha) is pronounced differently, depending upon the context (it is pronounced “wa”, when used as a particle) probably also helped.

With a hint of irony, I also had to learn the Japanese words for “learning” and “learn” . (「学んで」(mana-n-de), and 「学ぶ」(mana-bu), respectively), in order to actually state “I’m (trying to) learn Japanese”), beforehand.

That aside, I’ll move on to my…

Personal and Commercial Projects

After obtaining an ACS ACR122U RFID/NFC/smartcard reader, I have been performing research into various proprietary, and standardised smartcard protocols; and have discovered a useful hardware modification – which I’ll document at a later date. Some of my research has culminated in writing Wireshark dissectors for the USB CCID class, MiFare, and FeliCa application protocols – all of which have been accepted upstream.

Regular readers of my posts on the OMAP3530 board, who have probably observed that I haven’t said much about it, after my last aborted attempt at getting Symbian^3 running on it might be interested in knowing that I’ve partially succeeded in getting RISC OS running.

I’ve also been working on an Android application, as part of my first ever contacting position – although I can’t provide any more information, right now.

University

As far as university is concerned, my first year was fairly successful. However, I’m having to resit an exam for the Computer Architecture & Systems Software module – since I struggled with my initial attempt, and ultimately failed (despite trying extremely hard, and participating in class/tutorial sessions).

I partially blame a combination of stress and exhaustion – from having to wake up at 5:30am, and spending hours on travelling,  along with the  “rapid-fire” lecture delivery style provided by tutors in cramped theatres (whilst having to cope with aching knees, and inferior long-distance vision (compared to ~10 years ago)), for my failure.

Obviously, that problem was only exacerbated by having to transcribe handwriting in poorly-chosen colours (usually orange or lime green) from dimly-lit whiteboards in “real-time”, along with listening to the lecture content – which meant that my understanding of the rather complex subjects involved was hindered.

I’m tempted to see if I can adapt some of the techniques that I developed for learning Japanese, in order to to make revision easier, and surviving lectures more bearable – although computational mathematics is obviously more of a theoretical subject than language learning, or software development are.

I’m hoping to be more successful at this attempt – since I realise that failure isn’t an option, when my future hinges on the outcome of said exam.

Conclusion

Although I’ve got a lot to say, and I’ve over-egged the pudding a little, I’ll stop here. I hope that gives others a good idea of what I’m doing these days, though.

Thoughts on Distributed Window Systems

October 12, 2011

Introduction

In this post, I’ll propose Amadeus – a design for an experimental highly-distributed, extensible, and network-transparent windowing system that supports resolution-independence through the use of vector graphics technology, and scales from a single PC (or other device) to a large cluster of devices.

This will hopefully be achieved via the meticulous usage of compression, and adaptive data structures; the adoption of a multicast/broadcast architecture, and orchestration from federated or standalone Registrars.

My decision to write this proposal was inspired by interesting discussions with a friend regarding implementations of other systems (Display PostScript, NeWS, and the many window servers of Symbian OS); and reading various tirades against X11, plus documentation regarding various proprietary systems (especially Photon).

However, the system itself has a brand-new design (as far as I’m aware) – and probably plenty of stupid design mistakes that were rectified by others in the past…

High-Level Architecture

The Amadeus architecture consists of 4 main components:

  • The Rendering Surface – responsible for accepting hardware events, and rendering graphics data received from Applications via private channels or network broadcasts.
  • The Registrar – responsible for coordinating the activities of the rest of the architecture.
  • Applications – either built directly against a library that generates vector graphics data, and sends it to the Rendering Surface; or against a ported GUI widget toolkit (or compatibility layer for an existing windowing system) designed to do so.
  • Hardware Event Providers – responsible for collecting and dispatching hardware events.
These roughly fit together, like so:

Responsibility for font rasterisation and management is either directly accounted for by the Rendering Surface implementation, and a suitable rasterisation library (e.g. FreeType or MonoType iType) – in the case where text is embedded in SVG data, or by applications designed to deliver pre-rendered text as vector shapes and paths.

Descriptions of other window system architectures, such as Microsoft’s GDI and various successors, X11, Apple’s Quartz, QNX’s Photon, NitPicker, FreeDesktop.org’s Wayland, and variants of Display PostScript are best found elsewhere.

Authentication and Confidentiality

Authentication and confidentiality of signalling and graphical data network traffic is beyond the scope of this proposal – as other parties have more expertise in that area, and I feel that I cannot immediately improve upon existing designs. Those interested in such functionality should investigate IPSec (which should work with multicasting, according to this paper from Cisco), and SSL/TLS (or SSH) for private channels.

The Registrar

The Registrar announces its availability upon launch via network broadcasts (or multicasts); and tracks Rendering Surfaces, HWEPs and client applications interested in either listening for hardware events, or displaying windows on a per-machine, cluster, or network basis by unique name.

It also stores client configuration data (e.g. connected display resolutions, the characteristics of connected HIDs (keyboards, mice and game controllers), and preferred data structure widths), in addition to orchestrating the window management activities of machines within a cluster.

Whilst the intention is obviously to eventually support large-scale clusters and networks of “screens and machines”, with application windows freely distributed amongst them (in the case of X11-style invocation and display of applications installed on other machines); multiple Registrar instances (supporting multiple clusters or standalone PCs) shouldn’t conflict with each other, and it should always be possible for users to decide upon levels of isolation, and appropriate network topologies.

Multicast DNS (as implemented in Apple’s Bonjour/mDNSResponder, and Avahi), or D-BUS might be feasible technology options for implementing parts of this functionality.

The Rendering Surface

The Rendering Surface implementation accepts compressed SVG data from applications, and hardware events from HWEPs, received via either a private channel (e.g. a transient UDP socket with a port number known by the Registrar, a UNIX domain socket, or a platform-specific IPC mechanism), or a network broadcast/multicast transmission.

Instances thereof must register themselves using a unique name to the Registrar (and optionally specify a private channel), and accept any relevant events from Hardware Event Providers, such as mouse clicks and movements, and keystrokes.

The SVG data that applications generate should accurately render using any quality SVG implementation – regardless of its ultimate bitmap data destination (e.g. a raw framebuffer, or Qt’s SVG rendering widget), post decompression.

Compression Algorithms and Data Structures

Data structures used by Amadeus for signalling are designed to be extensible and easy to parse (explicitly identified using 64-bit field type IDs, and accompanied with content length fields); and capable of being dynamically resized to accommodate network connections with varying levels of quality (i.e. latency and bandwidth).

If so desired, it may be theoretically possible to adapt data structures from other protocols, to provide additional functionality – although in the case of some (e.g. the X11 Clipboard protocols), it would probably be a better idea to design new ones, in the long run.

Although it was originally intended that “plain” SVG 1.1 data be compressed according to the WBXML 1.3 specification from the Open Mobile Alliance, it should be possible to support alternative serialisations of an SVG data stream (e.g. transformed JSON), and additional compression algorithms (e.g. those implemented by ZLib/GZip) via the aforementioned extension mechanism.

An Open Source WBXML parsing and generation library (released under a variant of the BSD License, with a promotional clause), written in C++ is available from the Sybyx project on SourceForge. Although I haven’t attempted to use it (yet), I received the impression that its API is reasonably clean and well-designed.

Bilal Siddiqui’s DevX.com article also provides a rough idea of a conversion technique, and an archive containing a set of  XML files in both encoded, and non-encoded forms.

I have attempted to register the SVG 1.1 XML Document Type Definition ID (-//W3C//DTD SVG 1.1//EN) with the OMA, using their online form – although the process failed, due to a configuration error of the Web server.

Compression – State of the Art

Whilst I’m unaware of other, entire window system architectures utilising SVG for drawing, the technology has been successfully utilised as a significant part of KDE’s Plasma family of desktop environments; for rendering icons in the AVKON/S60 user interface framework for Symbian OS (and its successors); and for a multitude of other applications.

However, most implementations tend to assume that graphics files are stored as plain text XML files within a local (or remote/removable) file system, and can be quickly accessed prior to rendering – which works well for most applications, but is likely to be extremely inefficient within Amadeus, due to its network-bound, distributed nature.

The most obvious solution to this problem would be to use one of the aforementioned compression techniques (or another) – which is reinforced by this paper (circa 2003) from the seemingly defunct developers of the X-Forge game development toolkit, concluding that their proprietary compression technology compares favourably to PNG and JPEG bitmaps, in terms of resulting file size.

X-Forge’s developers were also able to achieve a bitmap-equivalent level of apparent image quality for a static set of textured game graphics (and further size reductions when cramming all of their resources into a ZLib-compressed archive), in addition to resolution independence – although in the case of Amadeus, it is highly likely that graphics will consist of both vector widgets, and wrapped bitmap images (e.g. photographs, Web graphics, and pre-rendered widgets from applications built against non-native toolkits), which may affect efficiency.

From very brief testing with GZip’s -9 argument, I was able to compress a copy of the SVG file (exported from InkScape in “Plain SVG” format) corresponding to the architecture diagram to 1.00 KB (1,024 bytes), from 3.97 KB (4,075 bytes). The original, uncompressed version of the file, exported without optimisations to remove InkScape-specific metadata was 5.18 KB (5,314 bytes) in size.

As previously mentioned, I have not yet tested a WBXML implementation against these files, for comparison.

Bitmap Image Support

Through the use of data: URIs, and Base64-encoded image files, it is possible to embed bitmap graphics data into SVG content, so that the aforementioned common use cases (e.g. display of Web image content, and graphics from other windowing systems) can be supported.

This technique could be combined with a hybrid local-distributed image caching system that is integrated with the Registrar, delta encoding of SVG payloads, and checksum-based URIs for referencing extracted bitmap image data within the cache.

More sophisticated approaches to this problem are described in a technical reference document from NoMachine, related to their NX unicast display/window sharing architecture (which in turn is closely entwined with the X11 architecture).

Conclusion

In isolation, distributed windowing systems; multicast architecture-based distributed systems in general; and vector-based GUIs are nothing new, conceptually. What Amadeus brings to the table is an amalgamation of these disparate concepts in the form of a modern, flexible design, that should be suitable for supporting multiple high-resolution displays, and users with wildly varying requirements.

Whilst I’ve left issues related to high-performance rendering of 3D graphics and video content, latency, security, and various other architectural aspects unresolved; I’ve hopefully provided an interesting starting point for debate on the design of such systems.

Decoding SkypeIdentityList Clipboard Data Using Qt

August 23, 2011

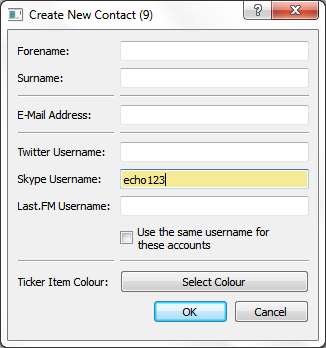
Whilst working on SocialClient (one of my numerous projects), I decided that I wanted to provide users with the ability to import Skype contact usernames from the clipboard (or via drag-and-drop), whilst using the Contact Builder dialogue:

Contact Builder UI

After briefly spending time searching the Web, I stumbled across an old post on the Skype fora (which happens to be the sole Google search result for “SkypeIdentityList“, at the moment), where someone requested information regarding the content of clipboard data generated by the Skype client – and provided some useful pointers for my own exploration.

With that knowledge in mind, I then obtained a copy of the Microsoft ClipBook Viewer (which doesn’t ship with Windows 7), and had a look at its “View” menu, after copying a random contact from the client’s contact list:

ClipBook Viewer

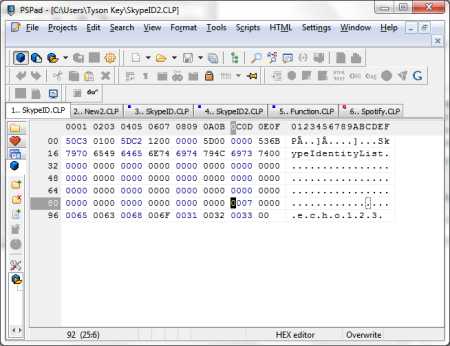
Saving the file, and then opening it with a hex editor (I used PSPad’s “Open in Hex Editor” feature – but any will suffice) revealed that the clipboard data was UTF-16-encoded text:

I initially planned to utilise QString‘s fromUtf16() method. However, further investigation lead me to believe that it was worse than useless in this case – since all that I had was the aforementioned opaque blob of data, which consisted of a header denoting the size of the following text payload, and I couldn’t find a way to convert it into the necessary format (a pointer to an unsigned, short integer; and a standard integer).

After much deliberation, and testing various potential solutions (some of which involved extracting the length data, and using it whilst iterating over the rest of the payload) that often resulted in dismal failure – involving either receiving C++ runtime assertions after attempting to access non-existent data within an array, or simply obtaining too little data to be useful, I settled upon a variant of the following solution:

QString Skype::FetchUsernameFromClipboard() {

QClipboard *clipboard = QApplication::clipboard();

if (clipboard->mimeData(QClipboard::Clipboard)
     ->data("SkypeIdentityList").length() != 0) {
QByteArray mimeData =
clipboard->mimeData(QClipboard::Clipboard)
     ->data("SkypeIdentityList");
return Skype::ParseClipboardData(mimeData);
}

else

{
return "";
}
}

QString Skype::ParseClipboardData(QByteArray aRawData) {
QByteArray workingData = aRawData;
int stringSize = aRawData.at(0);
int pos = 0;

QString round1Data, round2Data;
char tempChar;

QMap charMap;

qDebug() << "Got data:" << aRawData.toHex() <<
    "of internal length" << QString::number(stringSize);
qDebug() << "Size of array after filling is" << aRawData.size();

for (pos = 0; pos < aRawData.length() - 5; pos++) {
tempChar = workingData.at(pos + 2 + 2);
qDebug() << pos << tempChar;
round1Data = round1Data + tempChar;
}

qDebug() << "Processed data is " << round1Data.size();

for (pos = 0; pos < round1Data.size() ; pos++) {
int notNull;

if (!round1Data.at(pos).isNull()) {
notNull = pos;
qDebug() << "NOT A NULL: " << round1Data.at(pos)
   << "AT: " << pos;
charMap.insert(notNull, round1Data.at(pos));
}
}

foreach (QChar value, charMap)
round2Data = round2Data + value;

return round2Data.simplified();
}

The aforementioned implementation produces the following output, when used in conjunction with the demo method:

Got data: "070000006500630068006f00310032003300" of
    internal length "7"
Size of array after filling is 18
0 e
1
2 c
3
4 h
5
6 o
7
8 1
9
10 2
11
12 3
Processed data is 13
NOT A NULL: 'e' AT: 0
NOT A NULL: 'c' AT: 2
NOT A NULL: 'h' AT: 4
NOT A NULL: 'o' AT: 6
NOT A NULL: '1' AT: 8
NOT A NULL: '2' AT: 10
NOT A NULL: '3' AT: 12
"echo123"

Of course, code that triggers FetchUsernameFromClipboard() (or ParseClipboardData() itself) is also necessary – and the FetchUsernameFromClipboard() demo function doesn’t even exist within the SocialClient codebase; but that should give a good idea as to how I implemented this.

It probably isn’t the most efficient technique ever, either…

Still, as always, please feel free to comment and make alternative suggestions.

Attempting to boot Symbian^3 on the TMDSEVM3530 : Take 2

August 1, 2011

I’ve just received the USB/RS-232 adapter (which is based around the FTDI FT232BM chipset, and supported under Linux without any additional work), and connected it to the board’s UART1/2 port and my laptop using the null modem cable supplied with the board.

For the curious, dmesg reports:
[ 177.992226] usb 2-2: new full speed USB device using ohci_hcd and address 3
[ 1090.655407] usb 2-2: USB disconnect, address 3
[ 1160.036191] usb 2-2: new full speed USB device using ohci_hcd and address 4
[ 1160.656891] usbcore: registered new interface driver usbserial
[ 1160.656938] USB Serial support registered for generic
[ 1160.659703] usbcore: registered new interface driver usbserial_generic
[ 1160.659709] usbserial: USB Serial Driver core
[ 1160.676061] USB Serial support registered for FTDI USB Serial Device
[ 1160.677502] ftdi_sio 2-2:1.0: FTDI USB Serial Device converter detected
[ 1160.677628] usb 2-2: Detected FT232BM
[ 1160.677632] usb 2-2: Number of endpoints 2
[ 1160.677635] usb 2-2: Endpoint 1 MaxPacketSize 64
[ 1160.677639] usb 2-2: Endpoint 2 MaxPacketSize 64
[ 1160.677642] usb 2-2: Setting MaxPacketSize 64
[ 1160.694632] usb 2-2: FTDI USB Serial Device converter now attached to ttyUSB0
[ 1160.696459] usbcore: registered new interface driver ftdi_sio
[ 1160.696466] ftdi_sio: v1.6.0:USB FTDI Serial Converters Driver

sudo lsusb -v reports:

Bus 002 Device 004: ID 0403:6001 Future Technology Devices
    International, Ltd FT232 USB-Serial (UART) IC
Device Descriptor:
  bLength                18
  bDescriptorType         1
  bcdUSB               1.10
  bDeviceClass            0 (Defined at Interface level)
  bDeviceSubClass         0
  bDeviceProtocol         0
  bMaxPacketSize0         8
  idVendor           0x0403 Future Technology Devices
     International, Ltd
  idProduct          0x6001 FT232 USB-Serial (UART) IC
  bcdDevice            4.00
  iManufacturer           1 FTDI
  iProduct                2 USB-to-Serial
  iSerial                 3 FTE2QSKA
  bNumConfigurations      1
  Configuration Descriptor:
    bLength                 9
    bDescriptorType         2
    wTotalLength           32
    bNumInterfaces          1
    bConfigurationValue     1
    iConfiguration          0
    bmAttributes         0xa0
      (Bus Powered)
      Remote Wakeup
    MaxPower               44mA
    Interface Descriptor:
      bLength                 9
      bDescriptorType         4
      bInterfaceNumber        0
      bAlternateSetting       0
      bNumEndpoints           2
      bInterfaceClass       255 Vendor Specific Class
      bInterfaceSubClass    255 Vendor Specific Subclass
      bInterfaceProtocol    255 Vendor Specific Protocol
      iInterface              2 USB-to-Serial
      Endpoint Descriptor:
        bLength                 7
        bDescriptorType         5
        bEndpointAddress     0x81  EP 1 IN
        bmAttributes            2
          Transfer Type            Bulk
          Synch Type               None
          Usage Type               Data
        wMaxPacketSize     0x0040  1x 64 bytes
        bInterval               0
      Endpoint Descriptor:
        bLength                 7
        bDescriptorType         5
        bEndpointAddress     0x02  EP 2 OUT
        bmAttributes            2
          Transfer Type            Bulk
          Synch Type               None
          Usage Type               Data
        wMaxPacketSize     0x0040  1x 64 bytes
        bInterval               0
Device Status:     0x0000
(Bus Powered)

We can confirm that everything works by running cat /dev/ttyUSB0 from a BASH session, and powering on the board:

tyson@UmBongo:~$ cat /dev/ttyUSB0 

Texas Instruments X-Loader 1.47 (Jan 14 2011 - 15:43:28)
Starting X-loader on MMC
Reading boot sector

212836 Bytes Read from MMC
Starting OS Bootloader from MMC...
Starting OS Bootloader...

U-Boot 2010.06 (Jan 14 2011 - 15:43:45)

OMAP3430/3530-GP ES3.1, CPU-OPP2 L3-165MHz
OMAP3 EVM board + LPDDR/NAND
I2C:   ready
DRAM:  128 MiB
NAND:  256 MiB
*** Warning - bad CRC or NAND, using default environment

In:    serial
Out:   serial
Err:   serial
Read back SMSC id 0xffff0000
Die ID #2f7c000400000000040365fa1801900d
Net:   smc911x-0
Hit any key to stop autoboot:  0
mmc1 is available
reading boot.scr

421 bytes read
Running bootscript from mmc ...
## Executing script at 82000000
reading uImage

** Unable to read "uImage" from mmc 0:1 **
***** RootFS: /dev/mmcblk0p2 *****
Wrong Image Format for bootm command
ERROR: can't get kernel image!
OMAP3_EVM #

Obviously, since I renamed the uImage file on my Android SD card from earlier (to kuImage), the board fails to successfully boot Linux.

After downloading and installing CuteCom (a Qt-based serial console utility), and configuring it to communicate with the board at 115200 baud, using 8 data bits, and without parity or software/hardware handshaking, the help command command can be issued to the board’s bootloader – which results in:

OMAP3_EVM # help
?       - alias for 'help'
base    - print or set address offset
bdinfo  - print Board Info structure
boot    - boot default, i.e., run 'bootcmd'
bootd   - boot default, i.e., run 'bootcmd'
bootm   - boot application image from memory
bootp   - boot image via network using BOOTP/TFTP protocol
cmp     - memory compare
coninfo - print console devices and information
cp      - memory copy
crc32   - checksum calculation
dhcp    - boot image via network using DHCP/TFTP protocol
echo    - echo args to console
editenv - edit environment variable
exit    - exit script
ext2load- load binary file from a Ext2 filesystem
ext2ls  - list files in a directory (default /)
false   - do nothing, unsuccessfully
fastboot- fastboot- use USB Fastboot protocol

fatinfo - print information about filesystem
fatload - load binary file from a dos filesystem
fatls   - list files in a directory (default /)
fsinfo  - print information about filesystems
fsload  - load binary file from a filesystem image
go      - start application at address 'addr'
help    - print command description/usage
i2c     - I2C sub-system
imxtract- extract a part of a multi-image
itest   - return true/false on integer compare
loadb   - load binary file over serial line (kermit mode)
loads   - load S-Record file over serial line
loady   - load binary file over serial line (ymodem mode)
loop    - infinite loop on address range
ls      - list files in a directory (default /)
md      - memory display
mm      - memory modify (auto-incrementing address)
mmc     - MMC sub-system
mtest   - simple RAM read/write test
mw      - memory write (fill)
nand    - NAND sub-system
nandecc - switch OMAP3 NAND ECC calculation algorithm
nboot   - boot from NAND device
nfs     - boot image via network using NFS protocol
nm      - memory modify (constant address)
ping    - send ICMP ECHO_REQUEST to network host
printenv- print environment variables
rarpboot- boot image via network using RARP/TFTP protocol
reset   - Perform RESET of the CPU
run     - run commands in an environment variable
saveenv - save environment variables to persistent storage
setenv  - set environment variables
showvar - print local hushshell variables
sleep   - delay execution for some time
source  - run script from memory
test    - minimal test like /bin/sh
tftpboot- boot image via network using TFTP protocol
true    - do nothing, successfully
version - print monitor version
OMAP3_EVM #

At this stage, it’s necessary to remove the SD card from the board, and attempt to copy a Symbian ROM image to it.

Unfortunately, after installing Android, it’s also necessary to resize the ~70MB primary partition in order to make it fit. The quickest way to do so would probably be to use GParted and a USB card reader, if you’re using Linux under a virtual machine (as opposed to rebooting into a Wubi installation, in order to use my laptop’s internal reader, which I was initially tempted to do).

An SD card prepared using the the tool from the aforementioned archive contains an x86 partition table, and 3 partitions (a 70.57MiB FAT32 boot partition, a 941.31MiB Ext3 root partition, and an 870.71MiB FAT32 data partition).

Since it is possible to reconstitute these partitions using that tool, and since they’re unnecessary for the Symbian Platform, we can remove the root and data partitions, and then resize the boot partition to be 512.97MiB in order to store the Symbian ROM with some allowances for future growth.

If that process fails with “GNU Parted cannot resize this partition to this size. We're working on it!“, then:

  • Mount the boot partition (usually sdb1)
  • Copy all of its contents to a convenient location
  • Unmount the partition
  • Remove the partition using GParted
  • Create a new 512.97MiB FAT32 partition with 0MiB free space preceding it
  • Mount the newly created boot partition
  • Copy the “boot.scr“, “MLO” and “u-boot.bin” files from earlier to said partition
  • Unmount the partition – if you’re using a VM, and want to copy the ROM using the host OS, instead of the guest OS

Now, we can attempt to copy “beagle.rom.img” from the “ROM Images” directory to the root of the boot partition as “uImage“, unmount the partition, and then insert the card back into the board.

Unfortunately, at this stage, although several LEDs on the board illuminate, I can’t see any output from it on the serial console – which leads me to suspect that the bootloader and firmware on the card isn’t being loaded. Testing using the Windows CE card lends credence to that thought.

Attempting to copy the x-load.bin.ift file from /OMAP35X/Boot_Images to the root of the boot partition also yields the same result.

After quickly making some raw sector dumps of both SD cards, I suspect that the structure of the x86 MBR/partition table, and the location of the boot partition is a factor in the ability to boot the board.

For comparison, file reports the following, for the Windows CE card:

dump: x86 boot sector, code offset 0x0, OEM-ID "MSDOS5.0", sectors/cluster 64, root entries 512, Media descriptor 0xf8, sectors/FAT 236, heads 64, hidden sectors 135, sectors 3858489 (volumes > 32 MB) , serial number 0x61636637, unlabeled, FAT (16 bit)

For the modified Android card, this is reported, instead:

dump2: x86 boot sector; partition 1: ID=0xb, starthead 32, startsector 2048, 1048576 sectors, code offset 0xb8

With that in mind, since I’ve got a complete raw backup of the Windows card that I can restore later; I’ll remove the EBOOTSD.NB0, MLO, and NK.BIN files, and copy over the Android boot files (modulo the Linux kernel binary), plus a Symbian ROM image.

Lo and behold, we now have X-Loader and U-Boot, which attempt to boot our “Linux” kernel into 0x82000000, but seem to get stuck afterwards.

After getting this far, I’ll probably take a break, and see if manual intervention at the bootloader prompt gets us any further, later. 🙂

Attempting to boot Symbian^3 on the TMDSEVM3530 : Take 1

July 31, 2011

Given that I’ve recently obtained a Texas Instruments TMDSEVM3530 development board (which is supposedly a cousin of the slightly-more-popular BeagleBoard, from what I can gather), thanks to Andrew Back (and DesignSpark), I thought that it’d be interesting to see if I could get Symbian^3 running on it.

I’ve got another, more detailed post sitting in my WordPress drafts, but I thought that I’d share some rough notes that I managed to salvage from an unsaved document, prior to yet another ATI driver-induced BSOD moment, in the meantime.

Note: Everything mentioned here is the hypothetical product of “thinking out aloud”, and I can’t guarantee that anything mentioned here will actually work, or that your expensive development board won’t be reduced to a smouldering pile of rubble.

I also recommend obtaining a USB/RS-232 cable, if you haven’t either already got one, or you’re unfortunate enough to have a “modern”/”legacy-free” PC without RS-232 serial ports. Unfortunately, mine’s currently in Paris according to FedEx, so I’m working blindly for the moment.

It’s also probably a good idea to make either a copy of the individual files from the Windows CE demo SD card that ships with the board, or create a raw disk image of its sectors using WinImage, dd or a similar tool.

With that in mind:

  • Download and unpack the ROM Images.zip archive from DropBox
  • Rename or move the NK.BIN file in the root directory of the aforementioned SD card, so that it can be restored later
  • Copy either beagle.rom.img or wildducks_demo.rom.img from the ROM Images directory to the root directory of the card as NK.BIN
  • Unmount the card and insert it into the board’s SD card slot
  • Attempt to boot the board…

It’s probably also necessary to replace the MLO and/or EBOOTSD.NB0 files with new ones, although I haven’t got around to figuring out what to replace them with, yet.

Inserting the card into the board’s SD Card slot will cause it to display a splash screen containing 4 coloured squares during the boot process – but seemingly causes it to do little else (unsurprisingly).

At this stage, if you rely on using the Windows CE card to test booting from SD, it’d be a good idea to reinstate the original NK.BIN file.

Another approach would be to obtain another SD card, use the shell script contained within the “OMAP35x EVM” package from this page to install Android on it, and then replace the uImage file (after backing it up) with one of the files from ROM Images.

However, doing so results in the board’s LCD being blank during boot.

The chances are that at this stage, you’ve either:

  • Irreversibly damaged your board – unlikely, since booting the WinCE card works successfully
  • Got stuck in a bootloader loop somewhere – very likely, according to a wild guess
  • Successfully achieved a boot of the OMAP35x evaluation board using a ROM that obviously wasn’t intended for it – very unlikely

If you’re unable to debug the board using one of its serial ports afterwards, then the most that you can do is either stare at 4 LEDs, or replace the uImage file with the original version and play with an unstable build of Android.

With a serial cable, and the board’s bootloader console, you could probably attempt to try a modified version of the Quick Start instructions from the old Symbian Wiki.

If those don’t work, then attempting to load the ROM image at one of the memory locations mentioned in this QNX-related page, or at the Wild Ducks page might (if you’re lucky).

I’ll probably have another play, once my cable arrives…

Thoughts on Process Invocation with Qt and PoCo

June 9, 2011

Since late 2010, I’ve enjoyed developing C++-based applications with the Qt framework. Overall, I find it to be intuitive, fairly well-designed, and well-documented.

However, one area of the framework that I’ve found unsatisfactory (or at least struggled with, despite my best efforts) is the QProcess class. Ideally, I’d like to be able to instantiate it once, on a per-method (or per-class) basis with the appropriate executable path and CLI arguments, and then dump its output directly into a QString for use elsewhere.

I vaguely recall successfully resolving ~90% of the problem in Stroma (although that project’s architecture is currently rather monolithic) – but I never managed to solve the rest of it (actually dumping the output of the invoked process into a QString/multi-line text box widget).

After taking a break from that project for a while, I found myself encountering a similar problem in another project; and after reading various forum/mailing list posts and pieces of documentation, sought to find alternative means of resolution.

The most promising initial candidate was Boost::Process, although it appears that development is still ongoing – therefore, it isn’t an “official” Boost component yet.

With that I mind, I decided to install and investigate Poco::Process, after seeing a mention of it on StackOverflow, last night.

Installation under Fedora was trivial (involved running “sudo yum -y install poco-devel poco-doc” from a shell), and the appropriate header files were conveniently located in /usr/include/Poco for later perusal.

That said, I was sceptical about the quality and usability of the PoCo library itself, since the documentation and sample code felt relatively terse and incomplete; not to mention that guesswork (aided by this post) was necessary, when it came to actually integrating it into the build system.

However, once those hurdles are dealt with, basic integration with the Qt project build system simply involves appending the following to the project file:

#Headers for PoCo
HEADERS += /usr/include/Poco/Pipe.h /usr/include/Poco/Process.h \
/usr/include/Poco/PipeStream.h \
/usr/include/Poco/StreamCopier.h

#Libraries for PoCo
LIBS += -lPocoFoundation

Once the project file is configured, adding the following to your class header file (modulo existing references, of course) should work :

#include <QApplication>
#include <QString>
#include <QDebug>

#include <string>
#include <cstring>
#include <cstdio>
#include <iostream>
#include <Poco/Process.h>
#include <Poco/Pipe.h>
#include <Poco/PipeStream.h>
#include <Poco/StreamCopier.h>

using namespace Poco;
using Poco::Process;
using Poco::Pipe;
using Poco::PipeInputStream;
using Poco::PipeOutputStream;
using Poco::ProcessHandle;

Some of the aforementioned header files are unnecessary – although their presence doesn’t seem to cause any obvious problems at compilation or application execution time.

My method in question (a rather rudimentary/brute-force mechanism for returning the MIME type of a file as a QString object, based upon sample code from a presentation slide), looks like: 
QString FileTypeHandler::GetMimeType(QString aFileName) {

    qDebug() << "Inside FileTypeHandler::GetMimeType";
    qDebug() << "Have text: " << aFileName;

    std::string mimeCommand("/usr/bin/file");
    std::vector<std::string> mimeArgs;
    mimeArgs.push_back("-i");
    mimeArgs.push_back(aFileName.toStdString());
    Poco::Pipe mimeOutput;
    ProcessHandle mimeHandle = Process::launch(mimeCommand, mimeArgs, 0, &mimeOutput, 0);
    Poco::PipeInputStream mimeInput(mimeOutput);

    std::string mimeData;

    mimeInput >> mimeData;

    qDebug() << QString::fromStdString(mimeData);

    return QString::fromStdString(mimeData);

}

Theoretically/in essence, it accepts a file name as its argument, invokes the file -i command to (hopefully) look up its MIME type, stores it in a standard ANSI C++ string, and finally returns it as a QString for consumption by UI widgets.

In reality, it pretty much does just that – with the caveat that it doesn’t quite return the correct output. (It returns “/dev/null:” instead of “/dev/null: application/x-character-device; charset=binary“, for example).

Still, I hope that these notes are useful for others who are facing the same problem…

Maybe others can chime in with a better alternative, or other suggestions?